Table of Contents
See examples for SANS courses here !
Introduction
The goal of this template is to provide a way to write very condensed indexes typically for courses with multiple books. It takes advantage of LaTeX indexing by using a .idx file for organizing the index entries. The way this template can be used is by directly editing the .idx file.
See folder
examplesfor some real-life indexes which have already desmontrated their effectiveness.
Here is an example preview:
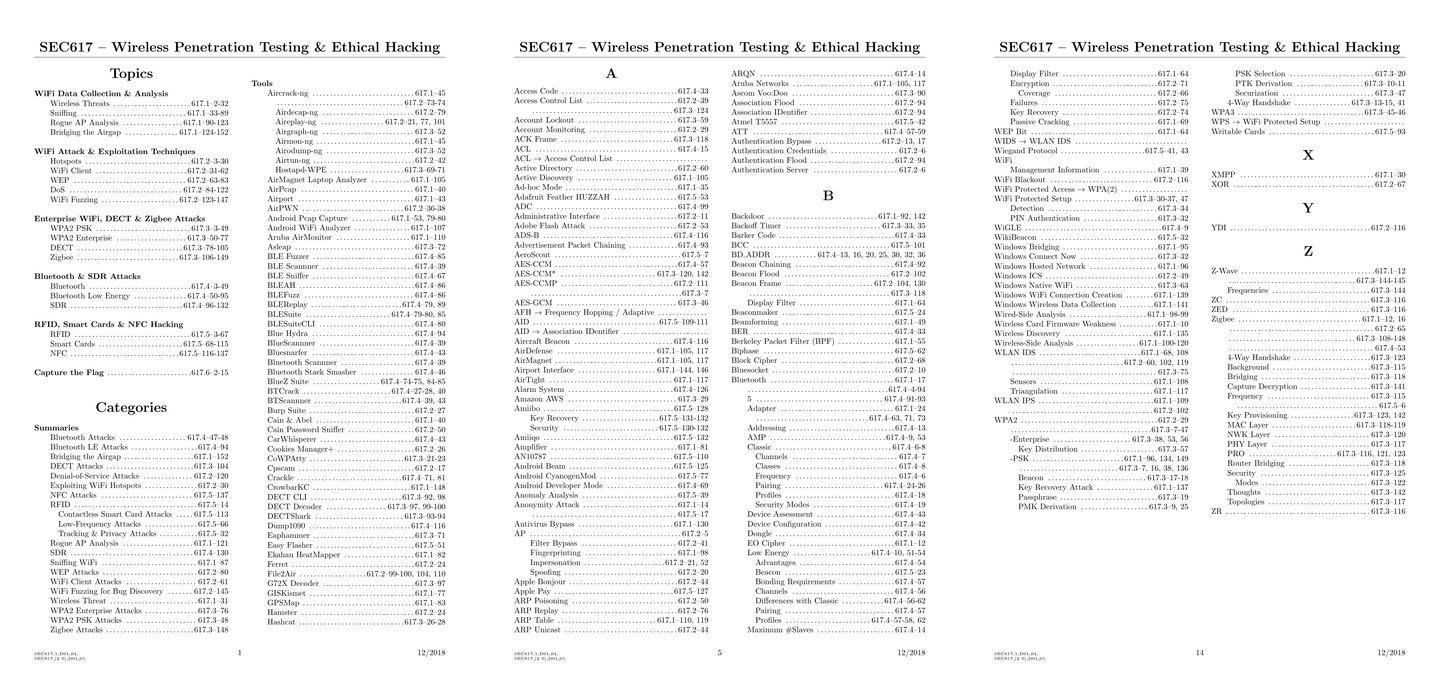
Preview image generated with this tool
Structure
The template is structured in the following way:
main.tex: This is the main TeX file to be compiled. No need to edit this file unless you require to adapt the layout of the course index.main.idx: This holds the index entries of the books of the course to be indexed.data.tex: This defines a few course-related variables (title, code, date and version) to be used inmain.tex.lib: This folder contains the images called inmain.texand for use inmain.idx(useful e.g. for mentioning that a tool is only for linux ; then use the\linuxcommand in the\indexentry).
Compilation
See this fork for a compilation script (see src/compile.sh) if you want to compile from your terminal.
The compilation can easilly be configured in Texmaker by defining a Quick Build Command:
- Go to the menu Options
- Select Configure Texmaker
- Go to tab Quick Build
-
In the field User : (…), replace the command with:
makeindex %.idx -s lib/std.ist|pdflatex -synctex=1 -interaction=nonstopmode %.tex|evince %.pdf|cp %.idx %.idx.bak|rm %.ilg %.ind %.aux %.synctex.gz - Then click OK
When editing the index with Texmaker:
- Open
main.tex - Go to the menu Options
- Select Define Current Document as “Master Document”
- Open
main.idxfor edition - Click on Quick Build to compile
This will produce main.pdf with all the index entries organized in a two-columns document.
NB: Do not forget to edit data.tex.
Important: It could happen that Texmaker is configured to remove temporary files while exiting, including
main.idx. That’s why the Quick Build herebefore includescp %.idx %.idx.bakto backup this file and not to loose hours of work adding index entries. If removal still occurred, simply restoremain.idx.baktomain.idx. Note that, consequently, the backup is not made if you do not build the document. So, mind clicking regularly on the Quick Build button !
Making your index
See this fork for a script (see src/add_entry.sh) to add new entries from your terminal.
The only files to be edited when making a new index are:
data.tex: Define the course attributes there (title, code, date, version).main.idx: Define the index entries there.
idx File Structure
main.idx file comes organized with a few example sections. Basically, one section represents a symbol, a digit or a letter for sorting the references. In this template:
- Symbols are reserved for the Topics section (e.g. for providing the course structure)
- Digits are reserved for the Categories section (e.g. for sorting interesting resources such as tools, commands, standards, …)
- Letters are used normally
The Topics and Categories titles are defined in lib/std.ist.
LaTeX Indexing Basics
The raw material of an idx file is the indexentry. The signature of this command is the following:
\indexentry{some_text}{page_number_or_range}
Example of valid index entry:
\indexentry{\textbf{Course Philosophy}}{1-10}
It is possible to provide a reference and to alias it with a desired text thanks to the “@” symbol:
\indexentry{reference@some_text}{page_number_or_range}
Important note: The format of
referenceaffects the index reference location. That is, an alias consisting of:
- 1+ digits and 1+ letters: will be sorted as a symbol, thus in the Topics section.
- only digits: will be sorted as a number, thus in the Categories section.
- 1+ letters then anything else: will be sorted as text, thus in the letter sections.
It is also possible to indent a reference under another one thanks to the “!” symbol:
\indexentry{some_text!some_indented_text}{page_number_or_range}
Example of valid index entry:
\indexentry{\textbf{Course Philosophy}!Principle 1}{10}
One can format the page number by using the “|” symbol:
\indexentry{some_text!some_indented_text|command}{page_number_or_range}
Example of valid index entry:
\indexentry{\textbf{Course Philosophy}|textbf}{10}
Commands Available in the Template
main.tex defines a few useful commands that can be mixed with indexentry in main.idx. Note that, in the following descriptions, ... must each time be set so that the entry is sorted at the right location in the document.
-
Adding a blank line:
\blankline\indexentry{...@\blankline|comment}{0}Example:
\indexentry{1b@\blankline|comment}{0} -
Insert a page break:
\newpage(standard in LaTeX)\indexentry{...@\blankline|newpage \comment}{0}Example:
\indexentry{999@\blankline|newpage \comment}{0} -
Fill in the page number with the book code:
\book{x}\indexentry{...|book{x}}{...}Example:
\indexentry{A reference in the third book|book{3}}{123} -
Insert a rating with stars:
\rate{x}\indexentry{... \rate{x}|...}{...}Example:
\indexentry{A very useful reference \rate{5}|book{1}}{45} -
Insert graphics:
\linux,\mac,\win,\all, …\indexentry{... \[graphic]|...}{...}Example:
\indexentry{A Windows-related reference \win|book{2}}{67}
Predefined Icons
For convenience, multiple shorcuts are predefined in main.tex and the lib folder for displaying icons:
\all: cross-platform ; Linux, Windows and Mac\android: Android\cloud: cloud icon with a server\coin: dollar (for paid asset)\ios: iOS\linux: Linux\mac: Mac OS\note: paper note with a pen\portable: USB key\python: Python script\script: general-purpose script\question: red question mark (e.g. for pointing an entry related to an exam question)\solaris: Soralis\web: Web-related asset\win: Windows
Related Projects
You may also like these:
- TeX Book Template: A template for writing a nice book with LaTeX.
- TeX Cheat Sheet Template: A template for creating a nice cheat sheet with LaTeX.
- TeX Master Thesis Template: A template for writing a nice master thesis dissertation with LaTeX.
- TeX Poster Template: A template for creating a nice scientific poster with LaTeX.
- TeX Slideshow Template: A template for making a nice presentation with LaTeX.